
In our previous blog covering the introduction of Paulownia Wood, we had several inspirational examples by some very talented woodworkers. In this follow-up blog, we will cover the “How-To” on building the Japanese-style Toolbox we showed you from that article with our product manager, George Snyder. This ultra-feather weight wood is the key factor in using Paulownia for this build. The box with shelves, weighs less than 8 lbs, making it an amazingly lightweight yet strong toolbox, despite loading it with various tools when completed.

Cut List:
- All Wood Thickness is 3/4″
- 1 Bottom: 30-1/2″ L x 13.25″ W
- 1 Lid: 24-1/2″ L x 11-13/16″ W
- 2 Sides: 30-1/2″ L x 9-1/4″ W
- 2 Ends: 12″ L x 9-1/4″ W
- 2 Handles: 12″ L x 2-1/2″ W
- 2 Box Top End Battens: 13-1/2″ L x 4″ W
- 2 Lid Batten (straight): 13-1/2″ L x 3″ W (1 batten will be cut/trimmed with a 5° on one side later)
- 1 Angled Lid Batten Lock: 13-1/2″ L x 3″ W (cut/trimmed with a 5° on side later)

The Tool box can be made to almost any size you desire. George stated, “I searched a few web sites and settled on this size. The #1 priority was the ability to store the saw in the box. For all 4 sides, square up one 6″ and one 4″ board to cover all side and end lengths required by the Cut List. I glued the boards using Titebond III, then clamped and let them set overnight. Once the glue has cured, remove clamps and cut to length on the table saw per the Cut List. Keep in mind the end pieces are inside the two sides, but the bottom is flush with the sides and ends. The holes for the Cut Nails need to be predrilled. The drill bit should be just a little smaller than the shank of the nail. I drilled through the first board, but not the second. The nails need to be oriented with the grain to avoid splitting the wood. Pre-drill 3 holes per side end into both boards for 1-1/4″ L Cut Nails, apply the Titebond III Glue, nail the side boards to the end boards, check for square and apply the clamps.”

Now that the end and side foundations are complete, George is ready to create the box bottom. This being the largest component of the box at 30-1/2″ L x 13.25″ W x 3/4″ thick, he cut 3 pieces of Paulownia to make up this size


After glue-up and clamp, George jointed the ends, cut the length and width bottom to size and sanded it for attachment.


Measuring for the 1-3/4″ cut nail placement followed by gluing and nailing completes the box shell.


This tool box will need some handles to carry it’s future load of tools. Per the Cut List, cut 2 handles, 12″ L x 2-1/2″ W, glue, pre-drilled for the Cut Nails, and clamp for both ends.

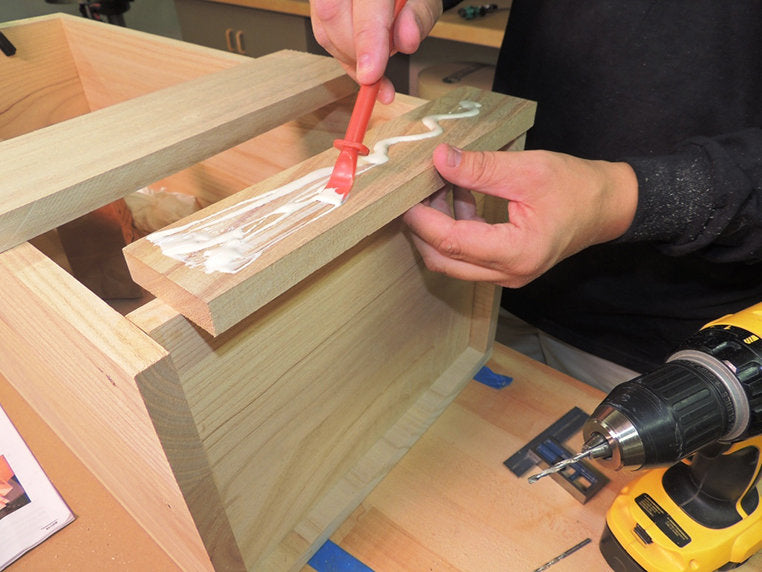

The final step in the box assembly is to add 2 box battens (13-1/2″ L x 4″ W) on top at each end. Although we recommend using clamps during glue-up and cut nails as we have shown throughout this build, as a time saving tip, you can simply tack all boards in place after gluing as shown.
The lid is made from gluing up two 6″ wide Paulownia boards with a finished cut size of 24-1/2″ L x 11-13/16″ W. Two additional battens and a lock batten are required for the lid configuration. Both lid battens need to be 13-1/2″ L x 3″ W. Measure 1″ from end of lid as shown. Both lid battens should have a 3/4″ overhang per side. Glue, clamp and cut nail into place.


Using the Micro Jig Microdial Tapering Jig, we cut a 5° taper on the lid batten and the corresponding lock batten. The lid batten width now measures 2-3/8″ at the smaller end of the taper plus the 5° along the 13-1/2″ length, making the larger end approximately 2-15/16″ wide. Place the lid batten 3-1/2″ in from the edge of the lid, measuring to the batten’s largest width end. Again this tapered lid batten also has a 3/4″ overhang per side. Glue and cut nail into place.


The lock batten is a free moving piece that wedges in between the tapered lid batten, and the box batten on one side.

An optional design can include an interior component area to house those sharp Japanese Saws…
…and a 4 box shelving system to aid organization to your tool box.


Shelf Cut List:
- (Optional Design) 2 Shelf Supports: 28-3/4″ L x 1/2″ W
- (Optional Design) 1 Hand Saw Slot Area (Bar): 28-3/4″ L x 2-3/8″ W
- (Optional Design) 2 Hand Saw Slot Area (Ends): 1-1/2″ L x 2-3/8″ W
- (Optional Design) 3 Box Shelves: 9-1/2″ L x 12″ W
- (Optional Design) 1 Box Shelf: 17″ L x 12″ W
- (Optional Design) Box Floor: Baltic Birch Plywood 3mm-1/8″ x 24″ x 30″; cut to size per shelf.
As a final addition, optional legs or box stand can be built. A simple design using 2 basic supports and four legs can be shaped to any desired look.


Leg/Foot Stand Support Cut List:
- (Optional Design) 2 Stand Supports: 16-3/4″ L x 4″ H x 2-1/4″ W
- (Optional Design) 4 Stand Support Legs: 9″ L x 4″ H x 2″ W
If desired, use Briwax to add a contrasting grain finish to your box and shelves.
In our previous blog on the introduction of Paulownia Wood, we included specifications and properties of the wood. We have included them below for your reference once again.
- Shrinkage is Radial: 2.7%, Tangential: 5.0%, Volumetric: 7.8%, T/R Ratio: 1.9.
- Paulownia air dries in 30 to 60 days without cupping, warping, cracking or splitting.
- Kiln drying takes 36 to 60 hours depending on dry kiln configuration, horsepower and dimension of lumber.
- Paulownia is resistant to decay and rotting provided it is not in permanent contact with the ground.
- Paulownia species vary in porosity according to variety but range from 75 to 88% in comparison with poplar 70 to 72%.
- Fire resistance is a feature of all Paulownia, ignition temp 420 to 430 deg Celsius as compared to average hardwood at 220 to 225 deg Celsius.
- Density of Paulownia species @10% moisture content ranges from 17.8 to 23.2 depending on variety and growing conditions.
- Thermal conductivity of Paulownia is very low thus giving it excellent heat/cool insulation properties.
- Chemical composition of Paulownia varieties: Hemicellulose Pentozan 22 to 25%, Cellulose 46 to 49%, Lignin 21 to 23%, Water 7 to 8%, Ash .50 to 1.1%, Fiber 58.5 to 60.1%.
Keep in mind the light weight of this wood for whatever applications you wish to use it for, and in keeping your tools very sharp for turning and carving applications.